Monday, August 30, 2010

Dulce De Leche Liqueur

If you like Irish Cream & caramel, you'll love this liqueur! I had a small amount of dulce de leche left over from my cupcakes, so I made a scaled down version of this recipe. It took a little time to get it mixed well, but it was a delicious treat! It would be fantastic mixed in with coffee for an after dinner drink.


DULCE DE LECHE LIQUEUR (Adapted from All Our Fingers in the Pie)

1-2 cups dulce de leche (adjust based on your preference)
1 cup vodka
2 cups half & half

Measure ingredients into a clean jar. Mix well and chill. Store in the fridge.

ENJOY!

Friday, August 27, 2010

Snicker's Cupcakes

While I've always like Snickers, I'm not sure that I'd rank these at the top of my cupcake list. The concept of a Snicker's Cupcake is a great idea. (Snickers are wonderful in most things - I make an awesome Snicker cookie at Christmas, and I LOVE Snicker Blizzards). However, the cupcake itself didn't impress me. Many people in the blog world seem to love the Hershey's chocolate cake recipe. While it was VERY light & moist (I'd be scared to make a layer cake with it!), mine sunk quite a bit after baking. Maybe I did something wrong, but I think I'd use a different chocolate cake recipe next time. And, although I'm critical of the cupcakes, they quickly disappeared, so I don't think all of my taste testers minded that they were a little flatter than I had hoped!)


SNICKER'S CUPCAKES (From Homemade By Holman)

HERSHEY'S PERFECTLY CHOCOLATE CAKE
Makes approx 36 cupcakes

2 cups sugar
1 3/4 cups all purpose flour
3/4 cup cocoa powder
1 1/2 tsp baking powder
1 1/2 tsp baking soda
2 eggs
1 cup milk
1/2 cup vegetable oil
2 tsp vanilla extract
1 cup boiling water

Preheat oven to 350 degrees and line pans with cupcake liners.

Combine sugar, flour, cocoa, baking powder & baking soda in a large boil. Add eggs, milk, oil and vanilla and beat on low until just incorporated. Increase speed to medium and beat two minutes. Stir in boiling water. NOTE: the batter will be thin!! (This is by far the thinnest batter I've made/used) Transfer batter to prepared pans, filling each liner about 1/2-2/3 of the way full.

Bake approximately 22 minutes, until a toothpick inserted in the center comes out clean. Cool in pans about five minutes and transfer to a wire rack to cool completely.

Fill cupcakes with caramel ice cream topping, if desired.


CARAMEL BUTTERCREAM

1 cup unsalted butter, room temperature
1/4 cup caramel sauce (I used ice cream topping)
1/4 cup heavy cream
1 teaspoon vanilla extract
4-5 cups powdered sugar

Mini Snickers bar for garnish

Beat butter on medium speed until smooth and creamy, about two minutes. Add caramel sauce, heavy cream and vanilla and mix to incorporate. Add powdered sugar, one cup at a time, beating on low speed until incorporated to reach the right consistency. Increase speed to medium-high and whip about one minute until light and fluffy. Frost as desired.

Garnish with Snicker's pieces (I chopped into small slices).

ENJOY!

Wednesday, August 25, 2010

World's Best Lime Fizz

I was served these wonderful fizzes for the first time about 5 years ago. My inlaws invited me over to celebrate my hubby's (then boyfriend's) birthday. They served BBQ Ribs (my hubs was always bragging up his Mom's ribs - they are delicious!) and had these lime fizzes as the refreshment. They are wonderful! A great change from a regular lemonade. (And just in time for Labor Day BBQ Celebrations!)


LIME FIZZ

2 cups sugar
2 cups water
5 medium limes

Make a simple syrup of sugar, water & lime zest. Bring ingredients to a boil, then simmer for 10 minutes. Remove from heat & cool. Add juice from zested limes.

(I found that by using a microplane zester, the flavor in the syrup is much stronger than if you use the zester that cuts long peels).

To make fizzes:

Pour lime syrup from above to make 1/4-1/3 of total drink volume. Gently layer very cold carbonated mineral water into the glass. Stir gently & garnish as desired. Serve immediately.

ENJOY!

Monday, August 23, 2010

Pesto & Parmesan Spaghetti Squash

I've been wanting to try spaghetti squash for awhile (I've never had it before!) While picking up some summer squash for grilling, I saw the spaghetti squash & decided to give it a try.

I'm not sure why my squash didn't have all of the strands that it's supposed to have (it really didn't look much like spaghetti), but it was a fairly easy side to prepare. We love pesto & often have it on hand, so I went with this recipe. If you like pesto, you'll enjoy this!


PESTO & PARMESAN SPAGHETTI SQUASH (From Bless Her Heart)

1 medium to large spaghetti squash (cooked)
1/4-1/3 cup pesto
1/3+ cup grated parmesan cheese

Once cooked squash is cool enough to touch, remove the seeds/waste from the center (if it hasn't already been removed). Use a fork to separate the the strands from the shell of the squash.

Toss the squash in a bowl with pesto and parmesan cheese. Salt and pepper to taste. Preheat Broiler. Spread your squash mixture in a medium baking dish and sprinkle the top with a layer of parmesan cheese.

Place the dish in the broiler for about 10 minutes or until the cheese on top gets a little crispy and takes on a golden hue.

ENJOY!

Friday, August 20, 2010

Easy Rhubarb Jam

Growing up, it was always a treat to have a jar of my great-grandmother's jam in the fridge. Sadly, she passed away just as I was discovering my love for cooking & baking, and I never had the opportunity to spend some time in the kitchen with her. One of my cousins, who lived much closer to her, helped my Grammie make jam in her last years, and she shared the recipe with me after her death.

Due to the ingredients in the recipe, I'm sure this wasn't a jam she had been making since she was my age (I don't think Jello has been around that long!), although I know she made it my whole life & I will always think of her when I make it.

This is a very easy recipe - making a amateur canner feel a little better about attempting canning for the first time. I'm not sure that my Grammie water processed her jam - with lots of family nearby, I thinks she handed out all of the jars before she had an opportunity to store any. I, however, only make jam once a year & ration my jars so that I have enough to last until the next summer. (If my family is lucky, I share a few jars!)


EASY RHUBARB JAM
Makes 8-9 jars (8oz each)

7 cups finely chopped rhubarb (I've used fresh & frozen - both work equally well)
3 1/2 cups sugar
1 can pie filling
1 (6oz) box jello (or 2 - 3oz boxes)

Bring rhubarb, sugar & pie filling to a boil. Boil for 10 minutes, stirring continuously. Remove from fire & add jello.

Carefully pour the jam into jars & water process to seal.

********************************************

Favorite Flavor Options:

Strawberry pie filling, strawberry jello
Raspberry pie filling, raspberry jello
Blueberry pie filling, raspberry jello (I tried Blackberry Fusion this time - also an excellent choice!)

********************************************

To water process the jars/jam:

While making the jam, have a canning pot full of water come to a boil. (Enough water to cover the jars). Place the lids & rims in a small saucepan of water - keep just below simmering.

Keep your jars in your dishwasher - on the heat dry or plate warmer cycle. (This keeps the jars warm & prevents breaking with the temperature changes.)

After you fill a jar with jam (to the bottom of the threads) place a lid on the jar, as well as a rim. Place filled jar in the canning pot & boil for 5-10 minutes. Remove from the boiling water, & sit on a cooling rack. Within a few minutes, you should hear the popping of the lids as they seal. Keep on the cooling racks until completely cool. Store in a cool place. (No need to be refrigerated).

********************************************

ENJOY!

Wednesday, August 18, 2010

Vanilla Bean Dulce de Leche Cupcakes

I think I may have found my new favorite cupcake! Caramel has long been one of my favorite flavors - I always choose caramel sundaes to chocolate ones, and prefer ice cream with caramel ripples.

I was excited to have found this flavor combination. I love using vanilla beans in baked goods, and the combination of vanilla bean cupcakes with the flavor of Dulce de Leche was WONDERFUL! The buttercream is by far my favorite buttercream flavor I've made yet (in fact, the leftovers may not make it onto more cupcakes, or even onto graham crackers... it may end up in by stomach by way of a spoon!).


VANILLA BEAN CUPCAKES (Adapted from The Culinary Chronicles)
Makes approximately 24 cupcakes

2 1/4 Cups All Purpose Flour
1 Teaspoon Baking Powder
1/2 Teaspoon Baking Soda
3 X-Large Eggs
1 1/2 Cups Vanilla Sugar
3/4 Cup Unsalted Butter (room temperature)
2 Tablespoons Vanilla Extract
Seeds from 2 Vanilla Bean Pods
2/3 Cup Sour Cream

Preheat the oven to 350°degrees and place paper liners in pans.

In a standing mixer, beat the butter and sugar together until light and creamy for about 2 minutes. Add the eggs, vanilla bean seeds, and vanilla extract. Mix until well incorporated. Slowly incorporate dry ingredients until well blended. Fold in sour cream until smooth.

Fill each lined cup 1/2 to 2/3 full. Bake for approximately 15 minutes. Cupcakes are done when a toothpick inserted in the center comes clean. Remove immediately from pan & cool completely on a wire rack.

Cut a small cone out of each cupcake & fill with a small amount of Dulce De Leche.


DULCE DE LECHE BUTTERCREAM (Adapted from Joy the Baker)

1 cup unsalted butter, room temperature
3 Tablespoons heavy cream
1 Tablespoon vanilla
4 cups powdered sugar
pinch of salt
3/4 cup prepared dulce de leche

Cream together butter and dulce de leche on low using an electric mixer. Add cream and vanilla and beat on medium speed until smooth. Add the powdered sugar and beat to incorporate.

Frost as desired.


ENJOY!

Monday, August 16, 2010

Dulce De Leche

I don't know that I can really call this a "recipe." This has got to be the easiest Dulce de Leche ever to make. While, some may say this is a little risky, I've had no problems.


Since I discovered this last fall, I always like to keep a stock on hand. You'll see a few recipes using Dulce de Leche coming up on my blog, but this is definitely tasty straight out of the can. It also makes a delicious ice cream topping!


DULCE DE LECHE

Sweetened Condensed Milk

Remove the labels off of the cans of sweetened condensed milk. Bring a large, deep pot of water to a boil. Place full (unopened) cans into the boiling water. Boil for 3-4 hours. (I make multiple cans at a time...if you're boiling 1 can for this long, you just as well boil multiple cans!) Be sure to keep the water level at least 1 inch above the top of the cans. After 3-4 hours, turn off the fire. Let water cool completely with cans in it (I usually let them sit overnight).

Open cans & dig in! (Keep in closed can until ready to use; once open, store in fridge)

ENJOY!

Friday, August 13, 2010

Blueberry Dutch Baby Pancake

After cupcakes, breakfast foods are definitely one of my favorite things to make. I could easily eat breakfast for any meal of the day. (This started at a young age with Chocolate Chip Pancakes at Perkins and Waffles with strawberries & whipped cream at home.)

I bought my cast iron pan 6 or so years ago, with intentions of making dutch babies. Can you believe that this was the first one I've made!?!? It was so incredibly easy to make - I'm sure I'll be making more now.


BLUEBERRY DUTCH BABY PANCAKE (Adapted from AllRecipes)

2 eggs
1/2 cup milk
1/2 cup sifted all-purpose flour
1 pinch ground nutmeg
1 tablespoon sugar
1-2 tablespoons butter
Blueberries
2 tablespoons confectioners' sugar for dusting


Place a 10 inch cast iron skillet inside oven and preheat oven to 475F.

In a medium bowl, beat eggs with a whisk until light. Add milk and stir. Gradually whisk in flour, nutmeg and sugar.

Remove skillet from oven and reduce oven heat to 425F. Melt butter in hot skillet so that inside of skillet is completely coated with butter. Pour all the batter in the skillet, and a handful of blueberries, and return skillet to oven.

Bake until puffed and lightly browned, about 12 minutes. Remove promptly and sprinkle with powdered sugar.

ENJOY!

Wednesday, August 11, 2010

Lime & Coconut Cookies

With a fruit bowl full of limes, I knew I needed to find some new lime recipes. These cookies were perfect for summer! The lime & coconut complement each other well, and the cookies have a wonderful chewy texture. Everyone at work loved them!


LIME & COCONUT COOKIES (Adapted from My Baking Addiction)

2 3/4 cups all-purpose flour
1 teaspoon baking soda
1/2 teaspoon baking powder
1/2 teaspoon salt
1 cup butter, softened
1 1/2 cups white sugar
1 egg
1/2 teaspoon vanilla extract
Zest of two medium lime
3 tbsp lime juice
2/3 cup toasted coconut
1 cup sugar for rolling cookies

Preheat oven to 350 degrees.

In a small bowl, stir together flour, baking soda, baking powder and salt. Set aside.

Using a mixer, beat together the butter and sugar until smooth and fluffy. Beat in egg, vanilla extract, lime juice and lime zest. Gradually blend in the dry ingredients and toasted coconut.

Roll rounded teaspoonfuls of dough into balls, and roll in sugar. Place on cookie sheets about 1 1/2 inches apart.

Bake 8 to 10 minutes in the preheated oven, or until lightly browned. Let stand on cookie sheet two minutes before removing to cool on wire racks. (This is important! They come off much easier after waiting 2 minutes!)

ENJOY!

Monday, August 9, 2010

Mushroom Mascarpone Ravioli with Sundried Tomato Alfredo Sauce

After successfully making homemade pasta noodles, I knew the next thing I had to try was ravioli. I'm always a huge fan of stuffed pastas, and with my husband's & my love for mushrooms, there was no question on what kind I would make first.

The filling was delicious, as was the sauce. While they tasted great together - I think there were too many competing flavors. Both recipes are definitely "keepers." I just feel they are better separately. Surprisingly, the sauce actually reheats rather well, especially for a cream & butter sauce.

The pasta makes the perfect amount for the ravioli - enough to feed 4-6 people (we only cooked 1/2 of them for a meal). We probably used about 1/2 of the sauce for 1/2 the ravioli, so easily enough for a meal of pasta for a family of 6.

Also, while ravioli is doable without a ravioli mold, I plan on getting one before my next adventure with ravioli - I'd prefer to have them more full than I was able to do without one.


PASTA DOUGH(From Cooking Weekends)

1 1/2 - 1 3/4 cup unbleached flour
1 1/2 cup semolina flour
1 tsp salt
4 large eggs
1-3 tbsp water

Place the 1 1/2 cups unbleached flour (to start), semolina and salt into the bowl of a food processor fitted with a blade. Pulse a few times to combine.

Add the eggs and 1 tablespoon of water to start. Pulse a few times. If the mixture seems too dry, sprinkle a bit more water over the mixture.

The dough should have the consistency of fresh bread crumbs,and start to form a ball. Add additional flour or water as needed to get desired consistency.

Gather up the dough and knead for a few minutes on a lightly floured surface until you have a smooth ball. Cover with plastic wrap (or place in a bag) and allow to rest for about 20 minutes.

Separate dough into 2-3 sections. Flatten the piece and run it through the pasta machine at the widest setting a few times. Fold and pass through the widest setting a few more times. After 4-5 runs through the widest setting, run through the narrower settings until desired thickness is obtained.


MUSHROOM MASCARPONE FILLING (Adapted from All Recipes)

1 tablespoon olive oil
10 ounces fresh mushrooms, chopped
2 tablespoons minced garlic
1 (8 ounce) container mascarpone cheese
salt and pepper to taste

Heat the olive oil in a large skillet over medium heat. Add the mushrooms & garlic - cook until the liquid from the mushrooms has evaporated, 5 to 10 minutes. Remove from the heat and set aside to cool.

In a medium bowl, stir together the mascarpone cheese and mushroom mixture. Season to taste with salt and pepper; set aside.

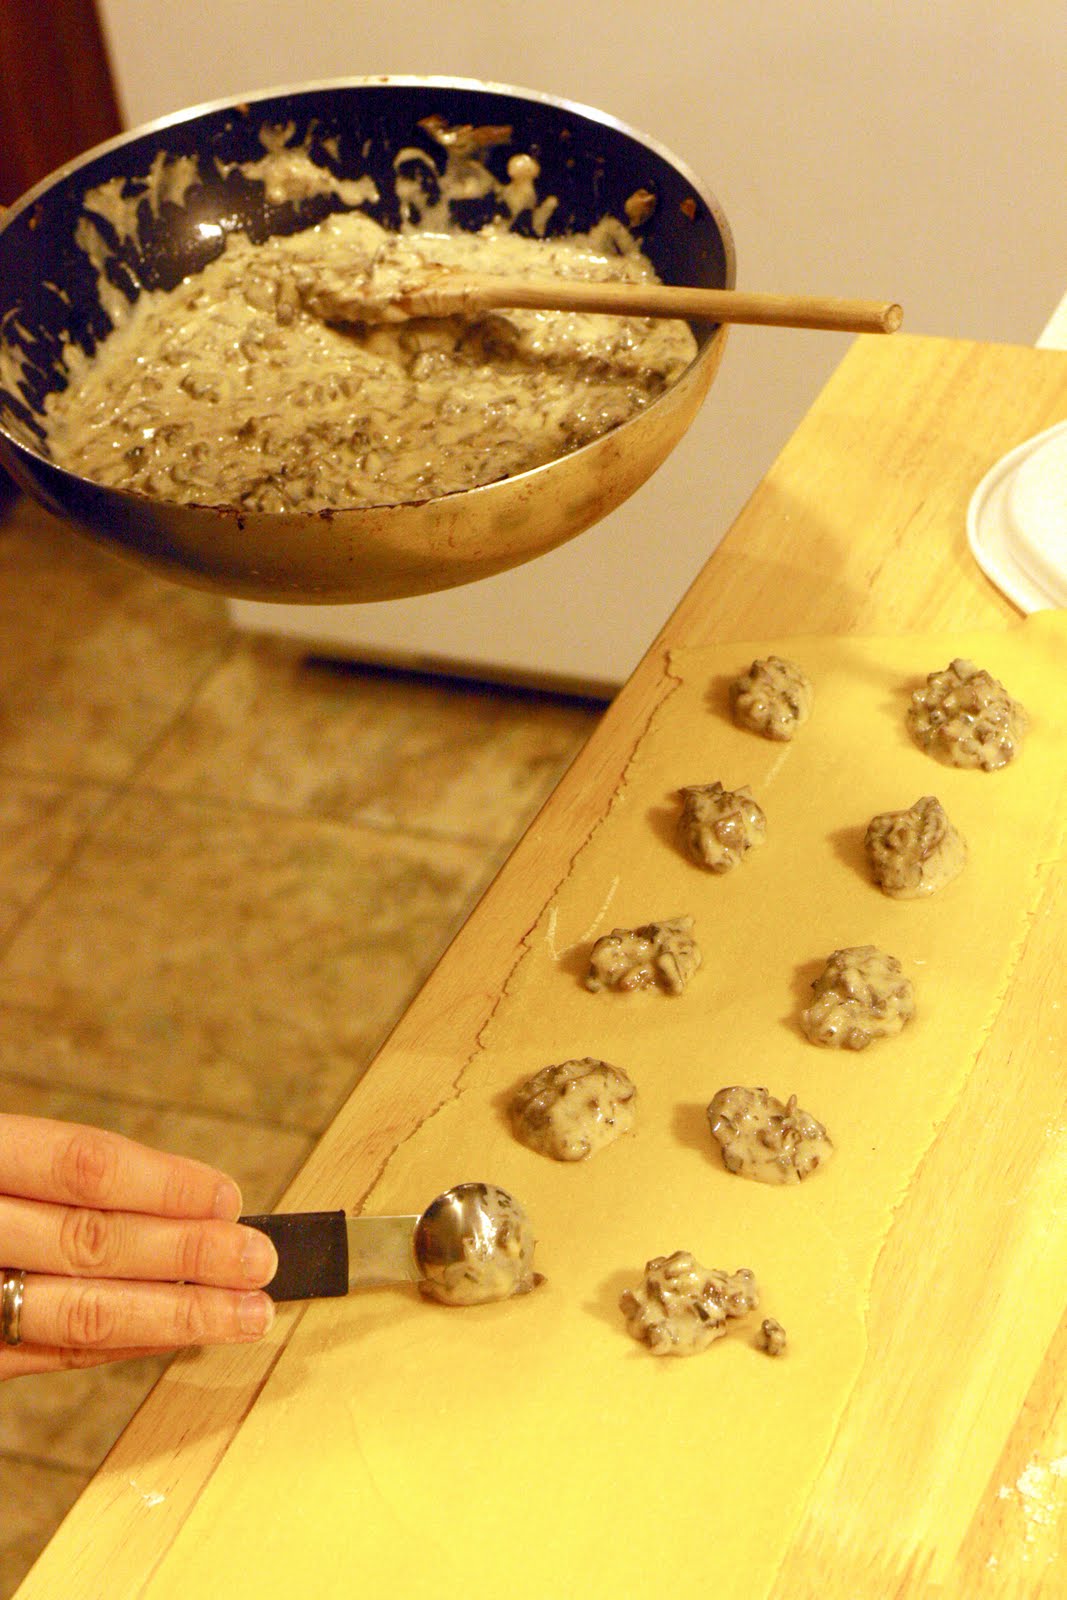
To form the ravioli, scoop 1-2 tsp of filling onto a sheet of pasta.


Brush egg around the filling & top with another sheet of pasta. Seal around the filling, trying to get as much of the air out of the filling as possible.


Cut ravioli into squares. Using a fork, press around the edges to help seal the filling in. (I think they look better this way, too!)


Boil for approximately 5 minutes (or until the pasta is done to your liking)


SUN DRIED TOMATO ALFREDO SAUCE (Adapted from The Open Pantry)

1/2 cup Butter
8 oz Cream cheese
3/4 cup Parmesan Cheese, grated
1 cup Milk or Cream (I used cream for a nice, thick sauce)
1/4 cup Sun dried Tomatoes in oil, pureed
2 cloves Roasted Garlic, pureed
Salt

Melt the butter in a medium sauce pan over medium low heat then add the cream cheese and Parmesan cheese stirring until melted. Add the Pureed sun dried tomatoes and pureed garlic. Stir, add the cream and cook until it begins to thicken and has a creamy consistency. Taste and add salt if desired. Serve over pasta.

ENJOY!

Saturday, August 7, 2010

Dill Cucumbers

Cucumbers are a summer staple in many homes. While we routinely add cukes to our salads, we wanted a simple side for our many grilled dinners. These are easy to make, and we always have the ingredients on hand. The are a great, cool side dish for these hot summer days!


DILL CUCUMBERS(From Disgustingly Good)

2 cucumbers, sliced thin
sea salt and fresh cracked pepper
2/3 cup sour cream
1 T. dried dill (or more, to taste)


Start by slicing the cucumbers thin. Place a paper towel on a drying rack, and layer the cucumbers on the towel, sprinkling with salt. Let them dry for 1-2 hours.

Mix sour cream, dill and pepper in a small bowl. Mix cucumbers with sour cream mix. Top with more dill and pepper and salt to taste if you need too.

ENJOY!!

Wednesday, August 4, 2010

Homemade Pasta

Until recently, I never thought I'd have the desire to make pasta. The boxes of dry pasta at the store are so incredibly cheap & easy. When I ultimately decided that I wanted to make pasta, I wanted the pasta attachment for my trusty KitchenAid Mixer. However, without knowing if I would truly like homemade pasta and the work going into it, I thought I would start with a hand-cranked pasta maker from BBB (which is much more affordable than the attachment).

I have to say, homemade pasta is definitely worth the extra time! It's easier with 2 sets of hands, and thankfully my hubby likes to spend time in the kitchen with me. We enjoy our "dates" in the kitchen making pasta (and enjoying the wonderful meal afterwards!)


SEMINOLA PASTA (From Recipes & Reviews)

1 cup All Purpose flour (I use unbleached)
1 cup semolina flour (I had to go to Whole Foods to get some)
1 pinch salt
3 extra-large eggs
1 tablespoon olive oil


Mix all ingredients in a stand mixer for about 1 minute with the paddle attachment (it will look slightly crumbly at this point). Reach in and form it by hand into a ball, then switch to the dough hook. Knead it for 5-10 minutes. If it falls apart, stop the mixer and form it back into a ball. Adjust the moisture level with small amounts of water or flour as needed.

Toss your dough ball into a plastic bag (or wrap in plastic wrap) and let it sit on the counter for approximately 30 minutes.

Divide your dough ball into 2 or more pieces. (Keep the piece you aren't using in the bag) Roll into a strip with a rolling pin. Then, set your pasta machine to its widest setting and run your dough through it. Fold the dough in half, and run it through again. Repeat approximately 5-6 times. If it comes out a little sticky, sprinkle on a little more semolina flour.


Now it is time to start working your way down through the thinner settings on your machine, one at a time, until you reach your desired thickness (we went from 7 - our widest setting - down to 3 or 4)

After the sheets are at your desired thickness, run through the cutting roller (my machine makes spaghetti & fettucini) Hang to let air circulate and dry the pasta for at least 10 minutes before cooking.


Remember, fresh pasta cooks MUCH faster than dry pasta. Any pasta you aren't using immediately can be stored in an airtight container in the fridge (we used the rest later in the week).

ENJOY!

Sunday, August 1, 2010

Snickerdoodle Cookie Bars

Oh my goodness... These are probably the best bars I've ever tasted. If you like snickerdoodle cookies, you'll LOVE these bars! They are very easy to whip up (which is great when you have the urge to bake at 11:30 PM and you work the next morning!) and have a wonderful texture. The bars themselves are dense & chewy, with a nice crisp topping. My hubby (who doesn't eat many sweets, but usually enjoys a good snickerdoodle cookie) couldn't keep his hands off of these cookies!


SNICKERDOODLE COOKIE BARS (Adapted from Brown Eyed Baker)
Makes 24 bars

2-2/3 cups all-purpose flour
2 teaspoons baking powder
1 teaspoon salt
1 teaspoon cinnamon
¼ teaspoon ground nutmeg
2 cups packed brown sugar
1 cup (8 ounces) unsalted butter, at room temperature
1 extra-large egg
1 tablespoon vanilla extract
2 tablespoons granulated sugar
2 teaspoons cinnamon

Preheat the oven to 350 degrees F. Lightly grease a 9×13-inch baking pan with butter & set aside.

Beat together the butter and brown sugar on medium speed until light and fluffy. Add the egg, and then the vanilla. Beat, scraping the bowl, until thoroughly combined.

Beat in the cinnamon, salt, nutmeg & baking powder. On low speed, gradually add the flour until just combined.

Spread the dough evenly into the pan. Combine the granulated sugar and cinnamon in a small bowl and sprinkle evenly over the top of the batter.

Bake for 25-30 minutes or until the surface springs back when gently pressed. Cool completely before cutting. Store in an airtight container at room temperature.

ENJOY!